Friday, May 29, 2020

FMP: Week 21 Friday

It's deadline day!! Today I went over everything to check that my files were all fully functional, and emailed the lecturers with the link just to make sure they had access. I also opened my onedrive on a housemate's PC to check that my UE4 file was working as intended. I submitted my high resolution screenshots, my 3ds max files, my ztools and my substance designer files alongside my presentation, videos and my final UE4 file with the saved folder deleted.

Thanks so much for sticking with me, I hope you enjoyed my FMP! I'm so incredibly sorry that I decided to make a post for each day, I really should have condensed them into weeks instead.

Here's my final screenshots!:


Thursday, May 28, 2020

FMP: Week 21 Thursday

On Thursday, I started compiling my flythroughs! I wanted to create one for aesthetic purposes and another showcasing the interactive gameplay elements. I considered rendering them out in UE4, but remembered the massively unnecessary size of the files when I tried doing so in previous projects, and the awful compression results I scrapped before. In the end, I opted to simply use the microsoft xbox screen capture during gameplay since it includes the audio. I did the same for my presentation, and got all three recorded!


Wednesday, May 27, 2020

FMP: Week 21 Wednesday

On Wednesday, I continued with the presentation! For this presentation, I tried to use more white text on gray than white text on black out of consideration for any dyslexic readers, and also downloaded the open dyslexic font, which I embedded into the presentation (not that I had much text to read to begin with).

I then added my name and logo into the master slides and went ham on pasting screenshots into each slide:

I split slides into high res renders, then construction slides to show off the assets and their breakdowns.
I decided not to include the material breakdowns in the end, as I didn't think I'd have enough space for them and they can be seen in my UE4 file regardless (and on this blog). I also omitted information on the majority of my blueprints and animations, as once again I didn't have enough space or time to spare on them. Instead, I focused on the parts that I thought were most relevant to game art as a whole, which means that the programming and animations got pushed to the side to make room for textures and shaders, as well as some smaller blueprints that were needed for VFX.
I included gifs and videos to showcase my VFX, but didn't include any audio. It's probably for the best considering I need to be able to speak over it.
Finally I got to the end of the presentation, where I could sit back and paste in my final renders

Tuesday, May 26, 2020

FMP: Week 21 Tuesday

On Tuesday, I started to gather together all of my screenshots ready to put into my presentation! There's not really much else to say other than it took a really... really long time to get everything together. I deleted my skysphere and atmospheric fog temporarily and took high resolution screenshots of individual and grouped assets based on their maps or their theme (eg. trim assets vs modular assets, foliage vfx vs particle vfx). I used gyazo to create small gifs of the characters and particle effects, and again for some of the videos, since I didn't need them to be large or high res. A small issue with deleting my sky sphere was that the shaders I created take the surrounding colours to affect the scene as a whole, which was fine for static poses as the shader didn't update, but as soon as I pressed simulate, the entire environment became darker. Luckily the gifs I used were small and didn't really need to be as well lit as the main high res screenshots!

Small handful of my many, many screenshots

Monday, May 25, 2020

FMP: Week 21 Monday

On Monday I finished up the scene, fixing texel density in places and adding a hollow blocking volume to the outside of the plinth to stop the player from jumping off into the abyss. I deleted some unnecessary material instances and pasted their values into the original material, and also combined some similar materials into one by using static switch parameters, since it would be cheaper to have one material and a few material instances than having several materials all using similar functions.

My water texture is now looking meatier than ever!
For the water texture, I also vertex painted the waterfall to blend into the lake a bit to get rid of the seam where the foam was being cut off abruptly.

After doing this, I decided that I wanted to make my water shader look a little more pretty, so I went back to the water breakdown I followed before where Adam Homoki said this unassuming little paragraph: 'The little sparks were mentioned in the talk, there’nothing special actually. It uses the normal map’s different channels formed into a dot product, followed by some multiplication, clamping, raising the values to a certain power.'

So, I had a go:
I fed the R and G channels for my two differently sized normal textures and plugged them into separate dot products, then lerped one with the other to reduce the amount of sparkles while maintaining a round shape. I fed this into a multiply and power node to increase the brightness in the emission later, and fed it into the lerp as an input node. The alpha was controlled by an if node and a scalar to easily adjust the amount of sparkles visible, then the lerp after that was just feeding it into the world position offset shoreline mask.

Friday, May 22, 2020

FMP: Week 20 Friday

On Friday I started working on a menu and loading screen following this tutorial series.

Menu Widget
Settings Widget
Controls Widget
Loading Screen Widget
Menu Event Graph
Settings Event Graph
Controls Event Graph
Loading Screen Widget

For the level blueprints, I hooked up the widgets and made them only accessible if no other widget was being loaded up. I hid the player character during the title sequence to get some shots of the environment, then unhid upon play. I made ESC either exit the game or return to the title screen depending on if the title was already visible or not too.

Menu screen in action!
I used a level sequencer for panning shots to fade in and out around the plinth!
Depending on the brightness of the scene, I changed the render opacity to make it darker to contrast the text more.
Settings and Controls are also accessible in play mode!

Thursday, May 21, 2020

FMP: Week 20 Thursday

On Thursday I changed all of my lighting to dynamic, since as a whole the scene has a lot of interactive and dynamic elements that will need it to be as such, and I could afford to do so with such a small scene. I also made sure to ask Kat in a feedback session if it was ok to do so before implementing it.

After that, I moved onto making some splashes for the water, as I realised I had an effect for moving around in it, but not for jumping in. Originally, I had planned to take a crack at making a mesh particle effect in houdini, but I ended up rejecting that idea after realising I could get an incredibly similar effect with a much cheaper method: layering textures. I loosely followed the idea of this tutorial, but added my own twist on it:

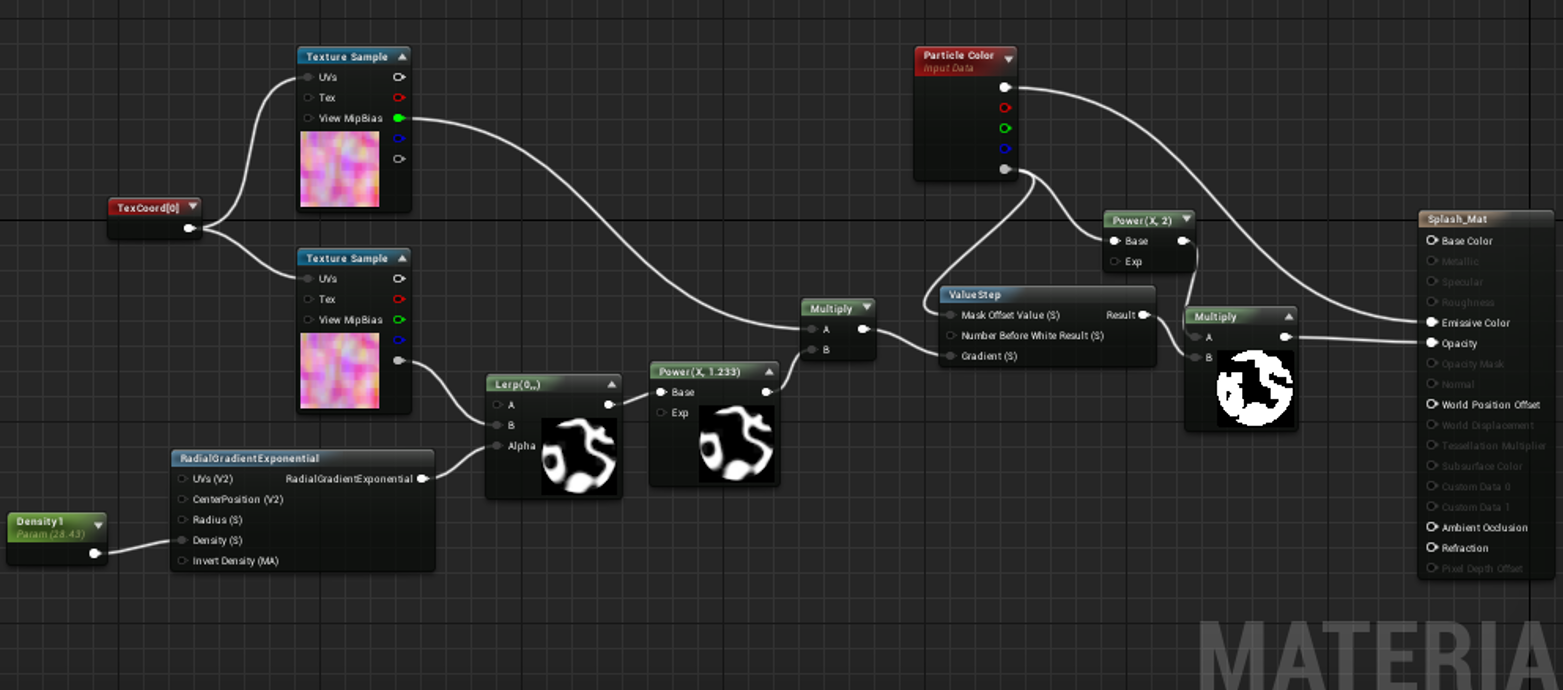
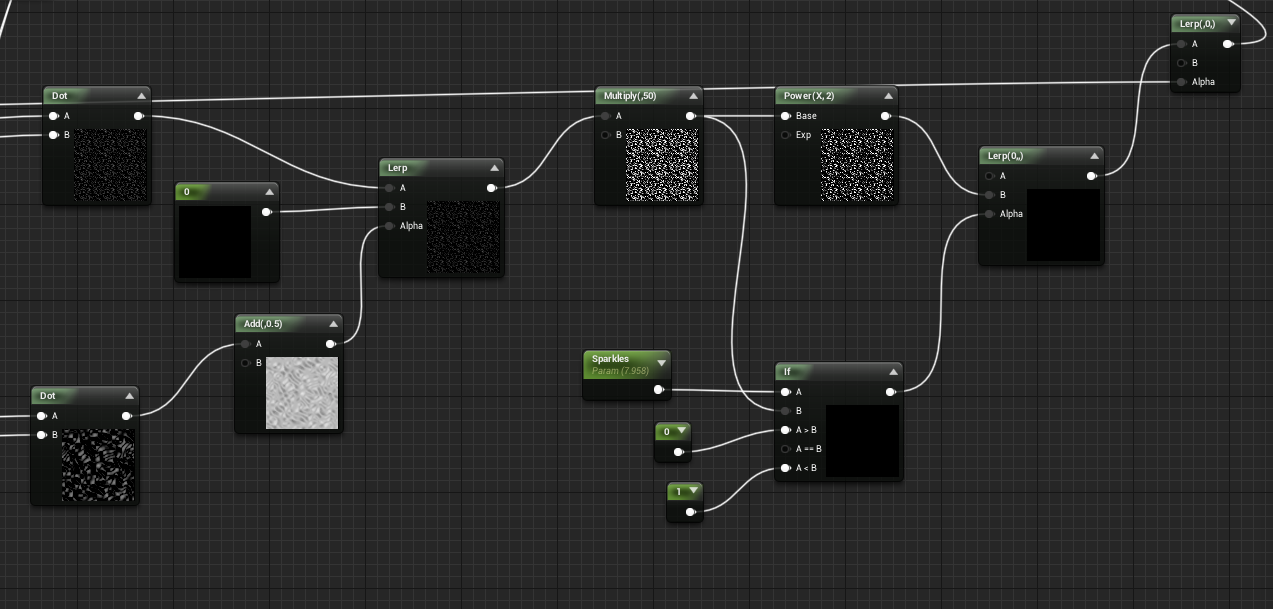
Using a noise map to create a squiggly line in a circle mask, then adding perlin noise to add areas that could be eroded by the value step, which is controlled by the particle opacity. Originally, paired this with a normal map of the same noise pattern, but then realised that I didn't need it since the material would be a flat, unlit colour like all of the other water effects.
Particle effect using velocity and acceleration to create a force and gravity effect for the droplets. I duplicated the emitter so that the layers would give it more depth and added random rotation to create variety.
Cheaper than a mesh particle with the bonus of matching the rest of the water :D
I simply plugged it into the already existing water blueprint here:
I had a convenient Z velocity pin open, so I checked to see if the character had a z velocity lower than 0, and if so the fake tick would generate the splash particle every 0.1 seconds. The sequence after generating a splash was plugged into a delay node of 0.1 seconds before reseting the DoOnce node to add a delay to the emitter without stockpiling them on the fake tick. It then fed up to the flip flop node alternating between ripple sounds for added audio effect. By doing this, I had a splash particle that could also serve as a kind of skipping stone effect if the player skimmed the top of the water.